Featured post

CEE PHOTOGRAPHY: Cells at Work!

Hey guys! I was invited to take photos of my friends who portrayed characters from a scientific anime called Cells at Work! It'...

Saturday 21 February 2015

Cee's 2015 Birthday Giveaway - WINNER

Congratulations to the winner of my 2015 Birthday Giveaway!


Winner was chosen via Random.Org after confirming and validating all entries:


The list was cut short because not all of the participants followed the mechanics. (Too bad)

Anyway, watch out for my next giveaway, hopefully very soon. Thank you so much for celebrating my birthday with me! ^_^


Wednesday 11 February 2015

Cee's 2015 Birthday Giveaway

It's nearly my birthday and I can't just celebrate it without hosting another online giveaway!

As promised on my shop's Facebook page, the prizes will be floral accessories handmade by yours truly and a cute dolphin hat from my sponsor Hatah Hatah!


This is a Facebook Giveaway so to join, visit my page by clicking the photo above or the link below:


One lucky winner will receive the following prizes:
Dolphin Hat from Hatah Hatah
Corsage for Prom or any occasion.
Floral Crown
Hair Stick
Hair Accessory for your Kimono look
You can share the photo once a day for more entry points. Just don't forget to comment on the photo the link of the shared post.
Giveaway will end on February 17, 2015 (on Cee's Birthday) and the winner will be chosen via Random.org. It will be announced shortly after. The giveaway is open to Philippine-based participants only.
Thank you so much and good luck!

Previous Post

Monday 9 February 2015

REVIEW: SPECTRUM Angel Blue Circle Lens

Circle lenses are optional in cosplaying (in my opinion) but still lots of cosplayers wear a pair when they cosplay to achieve that anime-like large eyes. I personally like wearing circle lenses because I want to accurately cosplay a character - eye color included.

This is a non-sponsored review. I bought this contact lenses with my own money.

So anyway, today I am going to talk about this pair of blue contact lenses that I have come to love every time I wear it.

Introducing:

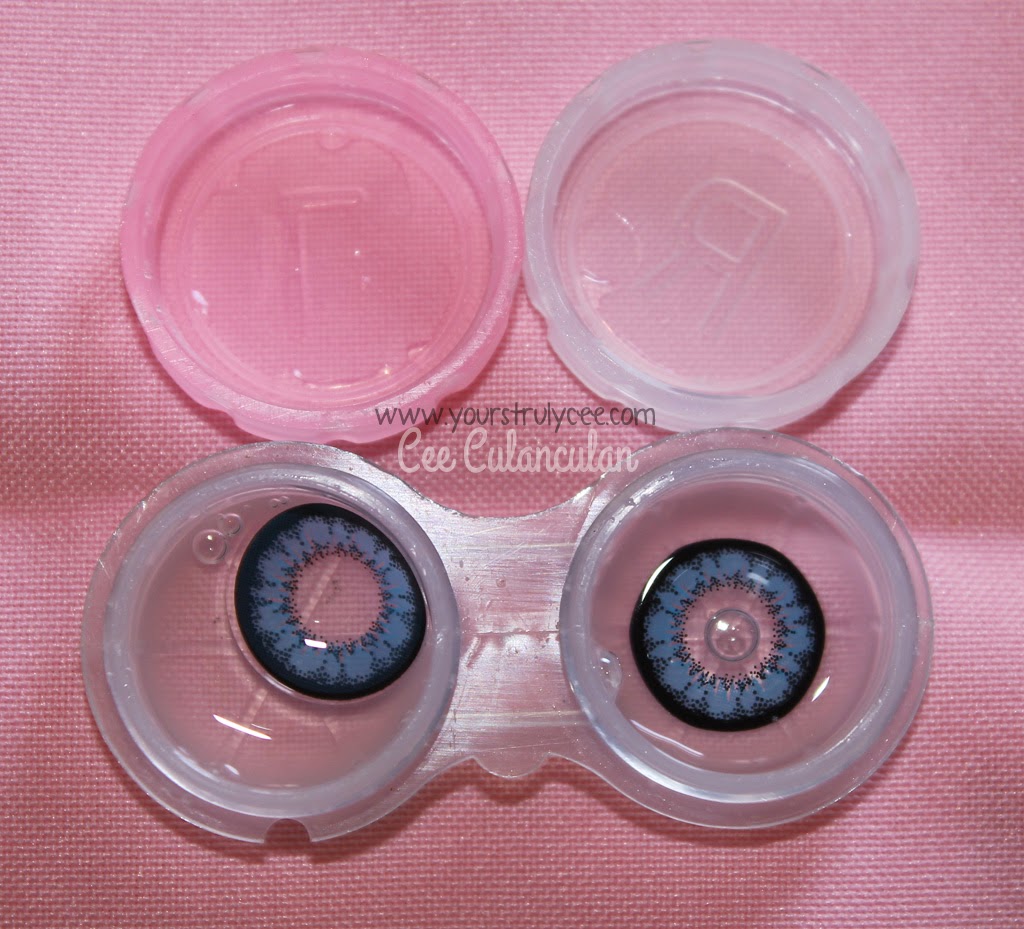
Spectrum Brand Angel Blue Cosmetic Contact Lens

Lens Details:
Origin: South Korea
Diameter: 15mm
Base Curve: 8.6
Water: 38%
Power: Plano
Life Span: 1 year


I don't want to spend a lot for a pair of lenses that aren't not vivid when worn. Most contact lenses' vividness depends on ones natural eye color. So for cosplayers out there who have dark-colored irises like me, choosing the right pair that will turn out vibrant when worn must be carefully done. I can safely say that most cosplayers don't want to spend lots of money on the wrong pair of lenses. (Cosplayers have other things to spend on too.)

I wasn't able to find previous reviews of this brand so buying this was a gamble. On the other hand, this would make me the first blogger to try this brand on and write a review about it.

Spectrum Angel Blue

What I love about this pair:
I am loving the simple design of this series. It's similar to GEO's Angel series and Crystal's Opal series. Compared to my previous favorite pair of lens, the Crystal lens that I ordered (which I thought was a very vivid pair), the Spectrum Angel Blue is now on my number spot in terms of vibrancy. Despite the fact that I have dark brown eyes (almost black), my eyes turned blue when I wore it. The simple design made it look like blue was my natural eye color. The black ring around the circle lens enlarged my eyes, which was good for my cosplays. (Anime characters tend to have large eyes.)
I didn't feel any discomfort the first time I wore it. I wore it up to 6 hours before feeling the need to remove it.

Contact Lens When Worn under Window Light
Taken with my iPad's front camera
Comparison


What I dislike about this pair:
It is actually difficult to fish out the lenses from its case. And a bit difficult to put on because of its thinness. (One must be very careful not to tear the lens when putting it on.)
Photo of the contact lenses when worn, with proper makeup and lighting.

Will I purchase another one soon?
Yes, definitely. I am so excited to purchase other colors from this series and brand. I hope they are as vivid as this.

Thank you so much for reading my short review.

Have you tried this Circle Lens brand before? What are your comments about it? Write down your thoughts below on the comment box!

Previous Post:

How to find your shared URL post (GIVEAWAY MECHANIC)


Advert:
Gift Bundle Sale

Saturday 7 February 2015

How to find your shared URL post (GIVEAWAY MECHANIC)

Giveaways are a way to invite more readers to ones blog. I host them from time to time so as a preparation for my upcoming giveaway, I want to show you how to complete a common mechanic found on most giveaways: 

"Share this post/photo and paste the URL of the shared post."


~~~~ 


This post will be a reference for future giveaways I will host (and for bloggers out there who requires this mechanic on their blog). Most of the time, one mechanic in joining my giveaways is to share a photo or post on facebook PUBLICLY and paste the URL on the required field to claim the raffle point. 
Here are simple steps on how to do it.

After sharing the photo or post of the ongoing giveaway PUBLICLY, go to your timeline and look for that post you shared.


Click on the time or date found on the post. This will direct you to the web page of that post as pictured below:


Copy the URL found on the address box of your browser (this is what they call the PERMALINK of your shared post) and paste it on the Giveaway app you are joining to earn the points for that mechanic:


or on the comment box of that giveaway photo on facebook (if it's required as a mechanic.)
Just make sure your shared post is on public mode so that the I can can confirm your raffle point at the end of the giveaway.


That's it! I hope this post is clear enough for you guys. :D
Good luck on joining online giveaways!


Previous Post:

Advert
Gift Bundle Sale

Friday 6 February 2015

MAKEUP: My usual makeup base products


New in cosplay? Can't figure out makeup?
Now let me enlighten you with my makeup style!

I am not claiming that I am the best. makeup artist in town. I am just sharing my makeup base routine every time I prepare for a cosplay gig. A lot of people have asked me about this so I have decided to write a short post about it.
This is not a tutorial. If you don't know how to apply makeup, makeup base etc... Visit youtube for simple video tutorials.

Comparison between my cosplay makeup from the first convention I attended to last year's PB shoot.

So first, let me list the products I apply for my base. I have watched numerous youtube tutorial videos and read a lot of makeup blogs before constructing my base combination. I have been using this method for quite some time and I think it is safe to say that I have improved a lot compared to the first few times I attempted to wear makeup. And I have received a lot of positive comments on how pretty my makeup was during the last con I attended.

Products that I use for my base:

Regardless of Makeup Brand:
Mosturizer
To protect my face from the long term effects of applying makeup.
Face Primer
For long-lasting hold.
Eye Concealer
Because I have dark circles under my eyes that don't disappear.
BB Cream + Liquid Foundation
I mix the two. BB Cream to cover up imperfections on my face and Foundation to create a clean canvas for coloring later.
Face Powder
To give that matte finish after the BBCream+Foundation application.
Eyelid Primer
To make my eyeshadow last long.

I won't be talking about brands here since this isn't a product review post. Instead, I am going to discuss the pros and cons of this method that I have observed after using it a lot of times:


Cons:
A few things I encountered while using this combination

You need a considerable amount of budget if you want to follow my makeup base routine.
You can buy the products one by one. Let your wallet breath in between purchases. :D
Some of these products were bought online. Try browsing ZALORA's makeup section if they have some of these products available.

You need to learn on how to correctly apply these products to be able to get the best results.
Don't worry. Youtube will help you on that. I might write a post about makeup application soon.

It takes a lot of time to apply everything. Sometimes, you need to wait for a few minutes in-between layer application for better coverage.
At first, it will be difficult ti apply all those layers but in time, you will learn how to apply them swiftly but surely.
A few gigs ago, makeup would take about 1-2 hours of my prep time. Nowadays, makeup only takes me less than an hour to apply.

You need to try out a few brands to find the right ones suitable to your skin type, complexion, etc.
My advice is to buy the smallest pack available and try it out first.


Pros:
What I observed after practicing on how to properly apply these products and trying it out during my cosplay gigs.

Longer lasting makeup.
You won't get scared that your face will run after sweating a lot of times during a lengthy event.

Minimal maintenance is needed.
All you need is is to carefully dab tissue on your sweaty or oily areas, brush a little powder and voila! The makeup stays on your face.

Better canvas for your eyeshadow, contouring and blush-on.
I noticed that I was able to apply the colors well after applying this base routine, compared to applying colors on bare skin.

Good cosplay makeup gives you a confidence boost.
I received favorable comments on my cosplay during my last cosplay event. My mom even commented on how good my makeup was, considering I didn't have any formal workshop on how to apply it. I think it's because of the good base that I applied.

It covers up blemishes and imperfections really well.
I have an imperfect face. I have scars and huge pores too but this routine covers them up and I am so happy about that.


Although for me this is the best routine that I have ever did, I still need to improve it further. I want a stronger, longer lasting base for long events such as a con or a long photo shoot. And there are minor imperfections I want to correct but then, I don't want to just add any other layer to solve my problem. I fear that my face will become all too light compared to my normal complexion!

You can use my makeup base method and modify one or two products to your liking. This can act as a guide for you to create your own layering. I had so much difficulty with makeup the first time I chose cosplay as a hobby so I hope this will help you a lot.

Just don't use this routine for your everyday makeup. Too much layering applied everyday will ruin your skin in time!

Thank you for reading and let me know on the comment box if this worked for you!


My previous makeup post:

Advert:


Wednesday 4 February 2015

Miku Hatsune Lots of Laugh MV Cosplay

Hey guys! As promised, here are the photos from last year's photo shoot with Mr. Tommy Bans - a photographer I recently got acquainted to. He and his photography team (Tomort Production) offer photo coverage for events such as weddings and birthdays. He was kind enough to contact me and ask if I can cosplay for him for a shoot. I couldn't say no to XDeal cosplay shoots!

So I talked to him and we agreed on the day and time of the shoot.

I brought two cosplay sets that day. Miku Hatsune and Sakura Kinomoto.


Mr. Tommy sent me a few photos of both sets. More of these are on his page:


I was a bit nervy during the entire shoot! It was my first time meeting Mr. Tommy and I got tensed up til the end. But good thing my friend Sheed was there to support me all the way! ^_^


I love the cuteness Mr. Tommy captured that day. I have always seen Miku as this cutesy girl with lots of personality (due to her numerous MVs). I tried bringing out any cutesy personality I have during the shoot. I hope I did good! What do you think?


Thank you so much to Mr. Tommy and his wife. It was nice meeting you last time. I hope this won't be our last cosplay session!


Thank you so much for reading and watch out for the Sakura Kinomoto photo set!

Advert:

Watch out for my upcoming shop sale and probably a giveaway!


 photo Online-Yellow-728x90.png